Oh! You’re Almost There!
Oh! Living On A Prayer!
The worst is behind you. Hours and hours of downloading is done. The Finishing Line is in sight... but there is still just that little bit more to go. You are another two or three hours from actually playing the game, if all goes well. Chin up. Keep that upper lip stiff. Take a deep breath. Let's do this thing.
Before we get started
First things first!
- Right-Click somewhere in the left pane of MO2 and select All Mods → Enable All
- Right-Click somewhere in the right pane of MO2 and select Enable All
SetESL Script
The ESM/ESP Count is going DOWN! DOWN, DOWN, DOWN!
Despite all the things we've done and all the best intentions of the Mod Authors, we still have a relatively high count of ESM/ESP files. We've driven it down a lot through the use of zMerge, but... WE CAN DO MORE! As it turns out, many of the files we have can be turned into ESPFE files, sometimes called ESL (though, really, that's a different file entirely). ESPFE files are ESP files that are "flagged" in xEDIT to be run as an ESL - all plugins with this flag will be combined at game runtime and loaded in the FE slot of the game's load order (which is why the limit is 254, not 255, BTW).
By running this script (as shown below), all the plugins that meet the criteria to become ESPFE will be automatically flagged, giving us more breathing room in the ESM/ESP counts.
- In MO2, click the Gears button to edit your executable paths.
- Select the SSEEdit entry
- Select the clone selected option.
- Rename the cloned copy to SSEdit - SetESL
- In the Argument field Set -PseudoESL
- Click Apply
- Now run SSEEdit - SetESL
- Load all Plugins.
- Highlight all Plugins.
- Right-click and select Apply Script.
- From the dropdown menu, locate the SetESL script.
- Click OK to Run the Script.
- Let the script Run (this may take a few minutes).
- Once the script has finished, Exit and Save.
LOOT Rules
Rule 1 - Lexy gets all LOOT...
Likely one of the most invaluable tools created for any Bethesda Open World game, but certainly for Skyrim, LOOT (Load Order Optimization Tool) is a utility designed to assist users in maintaining a working load order for their mod list. It uses user-submitted metadata to determine the "best" load order for a given set of modifications... which is great when you only have a few dozen but nowhere close to sufficient when your list has over 1,000 plugins as we do.
To help it out, we have the ability to provide "LOOT Rules", specialized sets of instructions on how to order certain mods and what order to do the sorting in. You might remember when you installed LOOT back in the beginning (oh so many hours of work ago...) that you set up a network of LOOT Groups - this is the moment you did that work.
For each of the plugins listed below, RIGHT-CLICK on the plugin and select "Edit Metadata". In the new window, add the plugin listed to the group they are listed with, then add any Load After rules that might apply as well.
Note that you are only ADDING or CHANGING things. When editing a plugin's LOOT rules, anything already listed under the Load After tab that can’t be deleted is part of the LOOT Masterlist and CANNOT be altered. So don't worry about those.
Creation Club Group
Unofficial Patches Group
Early Loaders Group
Underrides Group
Low Priority Overrides Group
Alternate Start Group
Village Mods Group
Trivial Smelters of Skyrim Group
CCOR Patches Group
Merge Patches Group
ELFX Group
ELFX Shadows Group
LUX Orbis Group
OWL Group
Late Loaders Group
NPC Retextures Group
Courier Overhauls Group
RS Children Group
Consistency Patches Group
Conflict Resolution Group
Conflict Resolution Patches (Late) Group
Load After LOOT Rules
Running LOOT
Take the Money and Run
Take another deep breath - you are now ready to actually sort your load order.
- In the top Left of the LOOT window, there should be an icon that should display "Sort Plugins" if you mouse over it.
- Click this icon to begin the sorting process.
- After the sorting process has finished, it should update the window with the calculated load order and an Apply Sorted Load Order button should appear in the menu at the top of LOOT.
- Press Apply Sorted Load Order and then close out of LOOT to continue.
This process has sorted our mods to be loaded in the order recommended by the LOOT master list, along with our necessary adjustments. This doesn't handle the order that the plugins themselves require. To fix this, we need to do a small adjustment in xEdit.
- Open xEdit through Mod Organizer 2 and click OK.
- Select all Plugins.
- Right-click on any Plugin and select Sort Masters from the menu.
- Once processing has finished, click the X in the upper right-hand corner.
- Uncheck Backup plugins
- Click OK to exit xEdit.
Moonpath to Elsweyr SSE - Music - Weather and Other Fixes - Ini’s for ENB
Moonpath to Elsweyr SSE - Music - Weather and Other Fixes - Ini's for ENB
This mod has it's own custom weather ini's for ENB to have all it's correct visuals and effects like wetness, lighting and distant lightning.
- Manually download the Ini's for ENB and extract the content of the Ini's for ENB folder inside the archive to the enbseries folder found in the Main Skyrim Directory.
- In MO2, locate Moonpath Music, Weather and Other Fixes.esp and make a note of the mod index number (Starts with FE, ignore the FE) for example my ModIndex-Number is for FE031 so mine is 031
- In the enbseries folder, locate _weatherlist.ini and open with Notepad or Notpad++
- Copy and paste the following, replacing the existing empty entries:
[WEATHER090]
FileName=!_Moonpath_Clear.ini
weatherIDs=xxx805
[WEATHER091]
FileName=!_Moonpath_Moisture.ini
weatherIDs=xxx87b
[WEATHER092]
FileName=!_Moonpath_Rain.ini
weatherIDs=xxx87e
- Replace the xxx with the mod index number for your install.
- Save and exit _weatherlist.ini
Pandora
Why are there no un-boxing videos?
Skeleton Animation changes, for the longest time, required a program called FNIS. Over the years since both Skyrim's and the mod's release, however, it gradually came to be unsupported. In the meantime, animation changers suddenly became a huge thing in the Skryim modding world again. Fortunately, a new modder gave us the completely appropriately named Pandora Behaviour Engine Plus. It's not your arch-enemy (that would be the NPC Merge), and it will let all kinds of neat things happen in Skyrim that couldn't happen before, including new animations, gender-specific animations, poses, walks, weapon grips, weapon placements, and much more.
This involves the use of an external patcher program, but it's very straightforward and won't take long at all.
Setup Instructions
Because Pandora will be creating new HKX files (files used by Skyrim for animation and motion): we want these files to be automatically sent to a mod instead of being tossed in the Overwrite folder. We can set this up by:
- In your Mod Organizer 2 file folder, locate and open the Mods folder.
- Create a new folder called "Pandora Output". Make sure to activate it in the left pane of MO2.
- In Mod Organizer 2, press the Executable button and select Pandora.
- In the 'Create Files in Mod instead of Overwrite' drop-down menu, select "Pandora Output"
- Select "Apply".
- Close the window.
Running Pandora Behaviour Engine Plus
Run Pandora Behaviour Engine Plus by:
- Select Pandora Behaviour Engine Plus in the executable selection box, and click [Run].
- The main Pandora interface should appear.
- If it does not, review the installation section for Pandora Behaviour Engine Plus on the Mod Page.
- In the bottom left, click the small cog that says Settings
- Point the Output Folder Path to Mod Organizer 2\mods\Pandora Output
- Make sure all the patches are checked.
- Press the big Arrow Button.
- Wait until you see Launch Finished.
- You can now Close Pandora.
- Verify that the Output was placed in the created Pandora Output.
A Quick Test
Did It Work?
You've been waiting for this moment for a long time. Before we do the last bits of Guide installation, we're going to actually load the game. We have chosen several locations that will test the install. To conduct this test, do the following:
- Deactivate the following plugins:
- A Clear Map of Skyrim.esp
- ACMOS - Falskaar.esp
- ACMOS - Wyrmstooth.esp
- ACMOS - WTT Patch.esp
- Atlas Map Markers - Conflict Resolution.esp
- Start Skyrim using the SKSE option.
- From the main menu, open the console (` key).
- Type coc and then the appropriate cell IDs from the list below to visit each of the shrines.
- Azura Statue:
ShrineOfAzuraExterior01 - Shrine of Mehrunes Dagon:
Mehrunes01 - Temple of Dibella:
MarkarthTempleofDibella - Temple of Meridia:
KilkreathRuinsExterior03 - Shrine of Talos:
MarkarthShrineofTalos - College of Winterhold:
WinterholdCollegeExterior
- Azura Statue:
If Skyrim crashes, something has gone wrong.
- If Skyrim doesn't crash reactivate the following plugins:
- A Clear Map of Skyrim.esp
- ACMOS - Falskaar.esp
- ACMOS - Wyrmstooth.esp
- Atlas Map Markers - Conflict Resolution.esp
- ACMOS - WTT Patch.esp
Main Menu CTD
If you crashed at the main menu on load, three main possibilities exist:
- You have a missing master.
- Check your Load Order in MO2, looking for a red triangle next to any file in the list.
- If these appear, identify the missing master and activate it.
- You have not extracted a BSA archive associated with a Skyrim:LE file that you converted earlier.
- Go through the Mod Pages to identify these mods, and verify that you have extracted the BSA files associated with them, if they exist.
- You have a mismatched version of SKSE and an SKSE required mod.
- Check all mods that have any SKSE plugins and make sure they are for the correct version of SKSE and Skyrim.
Auto-Generated SKSE Files
- After completing the Quick test and exiting the game, you may notice that an SKSE folder with a load of the files was auto-generated and placed into the Overwrite folder. We suggest creating a new mod out of these files by:
- Right-click Overwrite in left pane of MO2 and selecting Create mod
- In the new pop-up window, insert SKSE Output
- Click OK
- Activate SKSE Output in Left Pane.
Once that is done, perform the following Tweaks:
CrashLogger.ini
- Navigate to SKSE\Plugins\CrashLogger.ini
- Open the ini and locate; Crashlog output directory. Defaults to "Documents\my games[Skyrim]\SKSE"
- Add Crashlog Directory = drive letter:\Mod Organizer 2\overwrite
- Change Auto Open Crash Log = false
- Save and exit
OpenAnimationReplacer.ini
[UI]
uToggleUIKey = 210 (this will change the hotkey to open the menu to Insert)
uToggleUIKeyShift = 0
PapyrusTweaks.ini
[Experimental]
bIgnoreMemoryLimit = true
bSpeedUpNativeCalls = true
Pre-Bash Delevelers
Fixing Wrye Bashes Mistakes, Before Wrye Bash Makes a Mistake!
OWL - Pre-Bash Delevelers
This Mod fixes some mistakes when generating the Bash Patch.
FOMOD Instructions - OWL - Pre-Bash Delevelers
Wrye Bash
Wrye Not?
Wrye Bash is a old tool - it's been around since at least Oblivion - that can be used to install and manage mods. That, obviously, isn't how we are using it. It can also be used to merge leveled lists and other various objects without all the tedious mucking around in xEdit records and can even (if we needed it to) merge entire mods together.
Setup Instructions
Before we start, we need to setup MO2 so it will save the Bash Patch to a mod and not in Overwrite. We do this by:
- Create a new folder called "Bash Patch Output" Make sure to activate it in the left pane of MO2.
- In Mod Organizer 2, press the Executables button to edit your Wyre Bash executable.
- In the Wrye Bash executable, add the following to the Argument line: -o "Drive Letter:\steam\steamapps\common\Skyrim Special Edition"
- In the Wrye Bash executable locate 'Create Files in Mod instead of Overwrite' drop-down menu, select "Bash Patch Ouput"
- Select "Apply" and Close the window.
Building The Bash Patch
Now we can run Wrye Bash by:
- Make sure OWL - Pre-Bash Delevelers is active in the left and right panes of MO2.
- Select Wrye Bash in the Executables drop-down menu, then select [Run]
- Locate Bashed Patch, 0.esp
- Right-click on this mod and select "Rebuild Patch". NOTE: This will always appear this way, even if it is your first time building the patch.
- A popup box might appear telling you to deactivate plugins prior to building the Bash Patch; just click Skip.
- In the options list that appears, ensure that ONLY the following have checkmarks:
- Import Actors
- Import Actors: AI Packages
- Import Actors: Factions
- Import Actors: Perks
- Import Actors: Spells
- Import Cells
- Import Effects Stats
- Import EnchantmentStats
- Import Enchantment
- Import Graphics
- Import Inventory
- Import Keywords
- Import Names
- Import Object Bounds
- Import Races
- Import Races: Spells
- Import Sounds
- Import Spell Stats
- Import Stats
- Import Text
- Tweak Actors - Make sure Opposite Gender Anims: Female [Always Disable] is Checked.
- Tweak Assorted - Make sure Magic: Summoning Absorption Fix is Checked.
- Tweak Assorted - Make sure Mark All Water As Damaging is Checked.
- Tweak Settings
- Leveled Lists - Make sure Remove Empty Sublists is Unchecked.
- Click on "Tweak Settings" in the left pane. The following settings are recommended but can be set otherwise if you so choose. Right-Click on each setting listed to set the value indicated - if the value does not appear, enter it manually via the "Custom" setting:
- AI: Max Active Actors => 40
- Actor: Training Limit => 15
- Arrow: Speed => 1.4
- Combat: Max Actors => 30
- Crime: Alarm Distance => 1200
- World: Timescale => 15
- Ensure that there are checkmarks next to the following settings:
- AI: Max Active Actors.
- Actor: Training Limit.
- Arrow: Speed.
- Combat: Disable Projectile Dodging.
- Combat: Max Actors.
- Crime: Alarm Distance.
- Msg: Cannot equip item fix.
- World: Timescale.
- At the bottom of the interface, click [Build Patch]. This process generally takes about 10 minutes to run.
- Exit Wrye Bash by clicking the X in the upper right of the screen.
- Disable OWL - Pre-Bash Delevelers in the left pane of MO2.
- Bashed Patch, 0.ESP should have been automatically added to the Bash Patch Mod. If it does not appear there, Refresh MO2 and/or check in your MO2 Overwrite folder.
- Make sure Bashed Patch, 0.ESP is active in the Right Pane of MO2.
The Bashed Patch - as good as it can be - doesn't always get everything quite the way we want it. Rather than make you do the fixes in xEdit, we've created a Bash Patch Override that will fix the issues.
Post Wrye Bash Generation
Fixing Wrye Bashes Mistakes!
We don’t need to include Recipes anymore in the Bashed Patch. The ones that get included make new conflicts only.
Can’t change that in Wrye Bash directly. So we need to use xEdit to remove these edits:
- Open xEdit and load only “Bashed Patch, 0.esp”
- Click on the “+” in the left side to expand “Bashed Patch, 0.esp”
- Remove the “Constructible Object” record
- Confirm the warning in xEdit if it pops up
- Save the plugin and exit xEdit.
Bash Override
Fixing Wrye Bashes Mistakes Again!
Lexy's LOTD - Bash Override
This Mod fixes some mistakes when generating the Bash Patch.
This Mod fixes some Navmesh conflicts throughout the guide.
Synthesis
Creating Patches Is Easy!
Setup Instructions
Before we start, we need to setup MO2 so it will save the Synthesis to output a mod and not to the Overwrite folder.
We do this by:
- In your Mod Organizer 2 install folder, locate and open the Mods folder.
- Create a new folder called
"Synthesis Output"make sure to activate it in the left pane of MO2. - In Mod Organizer 2, press the Executables button and select Synthesis, In the 'Create Files in Mod instead of Overwrite' drop down menu, select "Synthesis Output"
- Select "Apply"and Close the window.
Generating Synthesis Output
Now is the time to generate the Synthesis Patches.
- Make sure you have launched Synthesis at least once outside of MO2 to set up the patchers.
- Launch Synthesis inside MO2. In the pop-up window, make sure Enabled MO2 Mode is checked and click Confirm.
- If you get an Access Denied Blocking-Error, just close and reopen Synthesis a few times until it goes away.
- Once Synthesis has finished loading the preloaded patchers, under the a_Synthesis Group, press the small arrow that says Run Group Pipeline. Synthesis will now create a_Synthesis.esp
- Quit Synthesis.
- Enable a_Synthesis.esp
- Relaunch Synthesis.
- Once Synthesis has finished loading the preloaded patchers, under the b_OWL Synthesis Output Group, press the small arrow that says Run Group Pipeline. Synthesis will now create b_OWL Synthesis Output
- Quit Synthesis.
- Enable b_OWL Synthesis Output.
- Make Sure the Load Order (MO2 Right Pane) is as Follows:
- a_Synthesis.esp
- b_OWL Synthesis Output.esp
Synthesis Blocking Errors
Synthesis will, on occassion, complain about "Blocking Errors". These are problems somewhere in the patcher that will prevent you from completing the above steps. If you get these, try the following steps:
- For the mod causing the blocking error (will have a red dot), find the "set to last successful run" button and press it.
- If the above fails, proceed to steps 2 - 4.
- If the above step is successful, run Synthesis patching as instructed.
- Click on "Skyrim Special Edition" in the top right corner.
- In the new screen, click the "lock icon" so it appears unlocked.
- For each errored patcher, in the versioning tab click "Match" for both "Synthesis" and "Mutagen" versions.
- If steps 2-4 fail, try deleting the temp synthesis folder located in AppData\Local\Temp
- If either "Skyrim Arrow Damage Scaling" or "DeadBodyCleanupNPCAttacher" patchers is still blocked, use the project drop down menu to re-select the appropriate patch.
- This will force a download of that patch from the appropriate GitHub repository, which should solve these two specific issues.
-
If the error in Synthesis mentions a missing mod:
-
Exit Synthesis and make sure that that all plugins are enabled on the right side of MO2.
-
If the plugin is enabled but the error persists, you may let Synthesis ignore the error.
-
In Synthesis, click the settings cog wheel on the top right.
-
Make sure you are in the Profile view called “Skyrim Special Edition”. Navigate there if not.
-
Scroll down if needed.
-
At the bottom, tick the checkbox “Ignore Missing Mods”.
-
Run Synthesis again as instructed above.
-
-
If all of the above fail, drop in on the Discord channel and create a Help-Desk post, and one of the staff will help you as soon as they are able.
Dark Face Issue Reporter
One Last Time - This Time With Feeling
Run Dark Face Issue Reporter
All the merges are made. The Bash Patch is created. Everything that can possibly mess with our poor NPC's faces has been done...
Which means it's time to run Dark Face Issue Reporter one last time.
- Open xEdit and load all plugins.
- In the left pane, highlight only:
- The Game's base ESMs (7 files)
- Unofficial Skyrim Special Edition Patch.esp
- 3DNPC.esp
- LegacyoftheDragonborn.esm
- Right-click any of those plugins, and choose "Apply script".
- From the drop-down menu, select DarkFaceIssueReporter and choose OK.
- Select Option 2: Run only for selected files or records
- Once the script has finished running, scroll to the bottom of the left pane and expand DarkFaceCollector.esp.
- If no DarkFaceCollector.esp appears, the ini wasn't edited or saved properly
- Expand the Non-Player Character (NPC) row if there is one.
- Any NPC listed has Dark Face, and you will need to troubleshoot what went wrong.
- Always delete DarkFaceCollector.esp if you saved it, before running Dark Face Issue Reporter again.
- Additional help can be gotten on Discord in the #installation-help channel.
- If the Dark Face Issue Report returns clean (only the File Header is listed), you can delete darkfacecollector.esp and proceed with the guide.
Fixing NPCs with Dark Face Bug
- Is NPC Retexture Merge Consistency Patch active in your left pane?
- If not, activate it.
- Are all NPCs shown from Interesting NPCs?
- If so, you forgot to merge the hotfix with the main file and so the main file is not active on your merge profile.
- Manually activate the main Interesting NPCs file.
- Check that the mods from page 5 of the guide are all in the correct order in your left pane on both your main and merge profiles.
- If you still have NPCs in your darkfacecollector.esp, take a screenshot (just the top of the list is fine if it's very long) and post it in the #installation-help channel of the Discord for support.
xLODGEN
Distant Mountains Have Never Looked This Good
Running xLODGen
- Create a folder called SSELODGen_Output At the ROOT of a drive.
- Once the above is done, open Mod Organizer 2 and add xLODGenx64.exe as an executable.
- In the Arguments field enter -sse -o:"Drive Letter:\SSELODGen_Output"
- Select xLODGenx64 from the executable dropdown and hit Run.
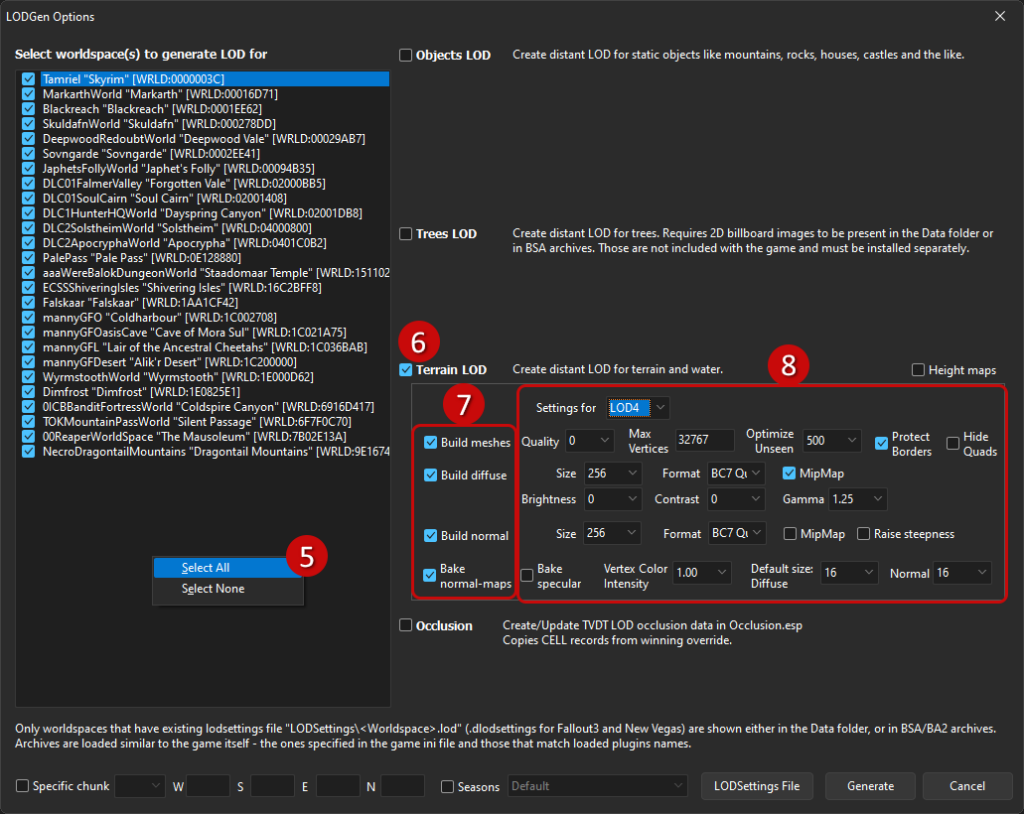
- In the Select Worldspace(s) box, check everything.
- This can be done by right-clicking in the window and choosing "Select All".
- Make sure only Terrain LOD is checked.
- Under Terrain LOD, check Build Meshes, Build Diffuse, Build Normal, and Bake Normal-Maps. This should be done for ALL LOD SETTINGS.
- Select LOD4 and set the following options:
- Quality: 0
- Diffuse Settings:
- Size: 256
- Format: BC7 Quick
- Optimize Unseen: 500
- Protect Borders: Checked
- MipMap: Checked
- Gamma: 1.25
- Normal Settings:
- Size: 256
- Format: BC7 Quick
- MipMap: Not Checked
- Raise Steepness: Not Checked
- Bake Normal-Map Settings:
- Default Size Diffuse: 16
- Default Size Normal: 16
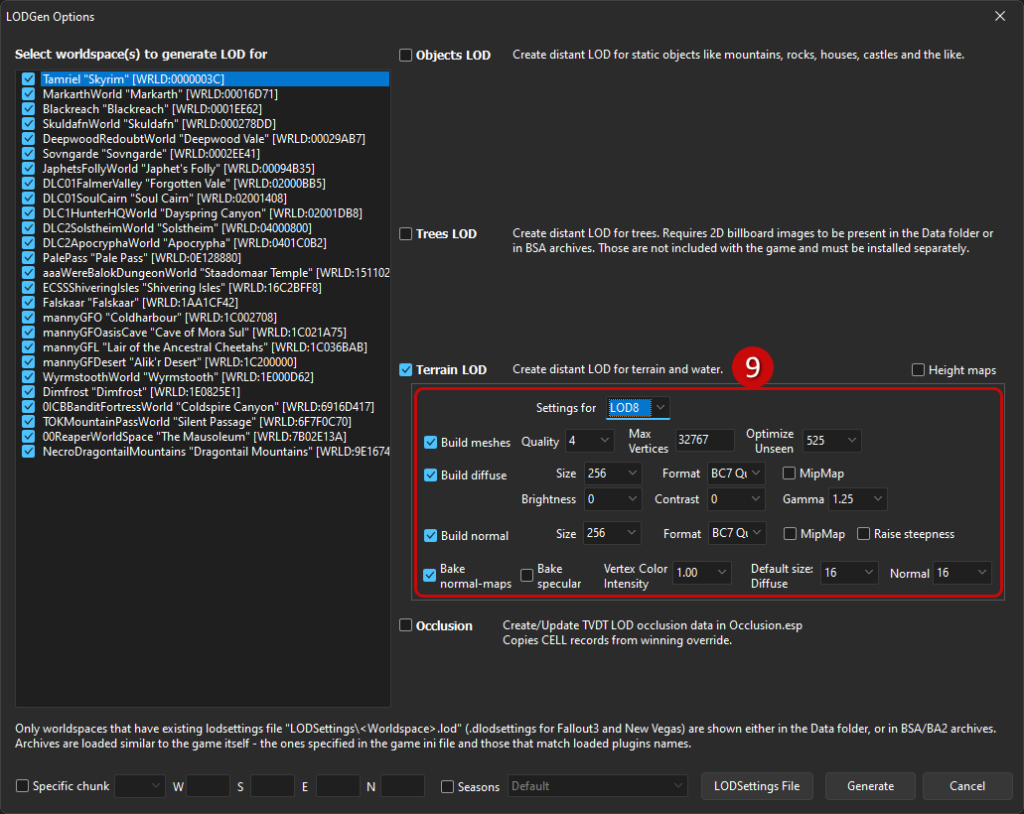
- Select LOD8 and set the following options:
- Quality: 4
- Diffuse Settings:
- Size:256
- Format: BC7 Quick
- Optimize Unseen: 525
- MipMap: Not Checked
- Gamma: 1.25
- Normal Settings:
- Size: 256
- Format: BC7 Quick
- MipMap: Not Checked
- Raise Steepness: Not Checked
- Bake Normal-Map Settings:
- Default Size Diffuse: 16
- Default Size Normal: 16
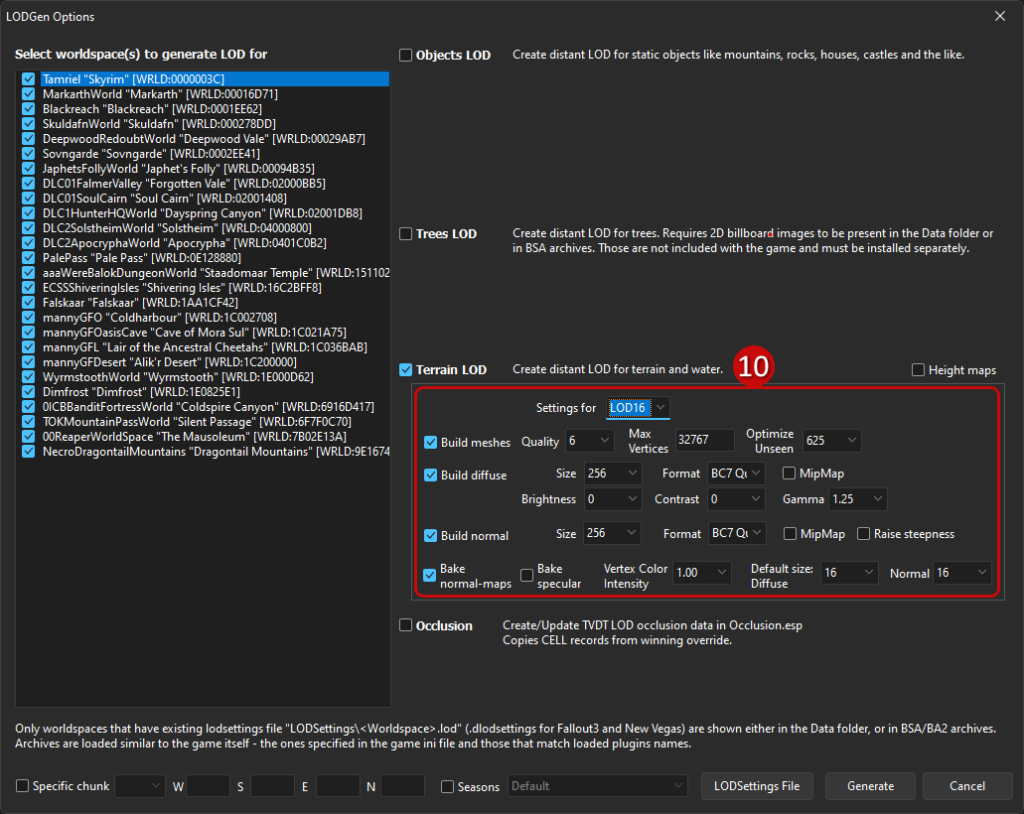
- Select LOD16 and set the following options:
- Quality: 6
- Diffuse Settings:
- Size: 256
- Format: BC7 Quick
- Optimize Unseen: 625
- MipMap: Not Checked
- Gamma: 1.25
- Normal Settings:
- Size: 256
- Format: BC7 Quick
- MipMap: Not Checked
- Bake Normal-Map Settings:
- Default Size Diffuse: 16
- Default Size Normal: 16
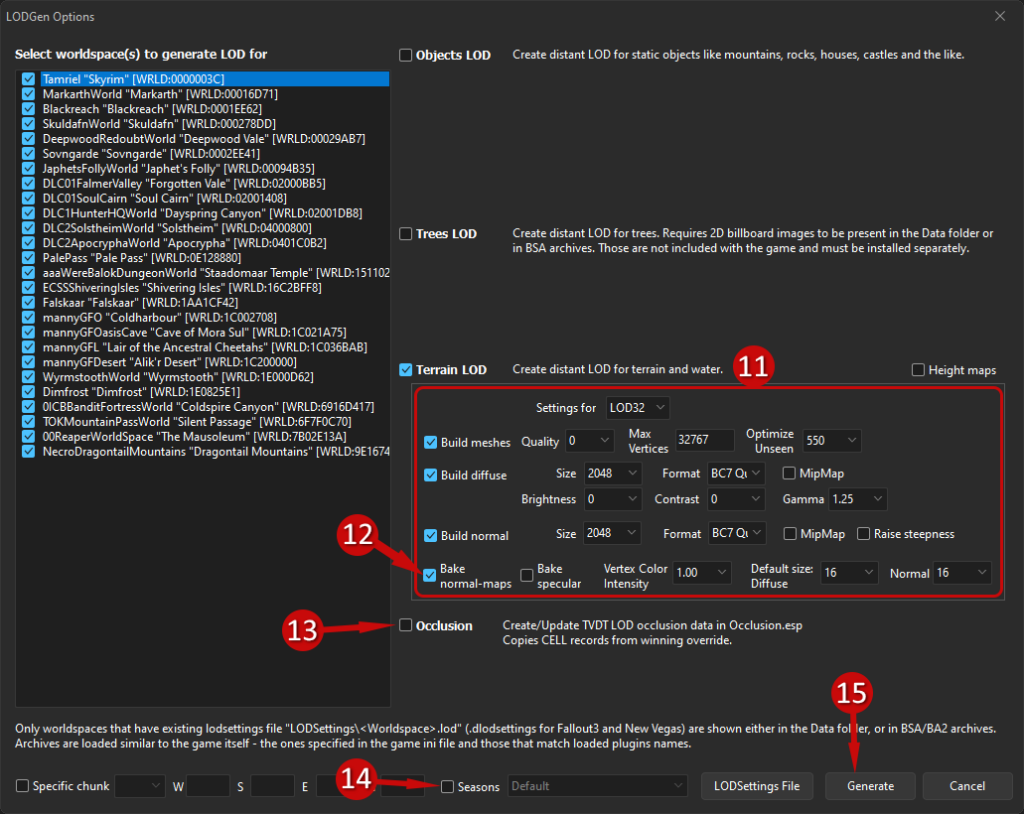
- Select LOD32 and set the following options:
- Quality: 0
- Diffuse Settings:
- Size: 2048
- Format: BC7 Quick
- Optimize Unseen: 550
- MipMap: Not Checked
- Gamma: 1.25
- Normal Settings:
- Size: 2048
- Format: BC7 Quick
- MipMap: Not Checked
- Raise Steepness: Not Checked
- Bake Normal-Map Settings:
- Default Size Diffuse: 16
- Default Size Normal: 16
- Ensure that Bake normal-maps is checked on all LOD Options.
- Ensure that Occlusion is unchecked.
- Make sure Seasons is unchecked.
- Click Generate.


xLODGen Road Generation
- Select ACMOS Road Generator from the executable dropdown and hit RUN
- From the Drop down menu select Paths Only
- For "Path to LOD," browse to the SSELODGen_Output folder.
- Click Generate.
- At the prompt to "Overwrite LOD Textures," choose Yes.
- At the prompt "Would you like to zip the output," choose No.
- Wait until it says "All Done!" and then close.
- Profit.
- Once the generation finishes, exit ACMOS Road Generator tool, navigate to where you created the SSELODGen_Output directory and copy it to your MO2 mods directory.
- Refresh your mod list in MO2, and activate the newly created SSELODGen_Output mod.
DynDOLOD Error Fixes
The Reason Why You Can See Solitude's Windmill Turn
DynDOLOD TexGen Fixes
I noticed that when I created my specific LODs, one of my problems was having to go through each and every individual mod. However, I would be happy to provide patches for the general public to utilise and use.
FOMOD Instructions - DynDOLOD TexGen Fixes
LOD Model Library for DynDOLOD
Matching LOD models for SMIM, Happy Little Trees, FYX Shacks, Praedy's Soul Cairn, Skyrim Remastered and more.
FOMOD Instructions - LOD Model Library for DynDOLOD
Lexy's LOTD - Dyndolod Error Fixes
Fixes some errors highlighted by DynDOLOD.
DynDolod - Darken texture for generation
DynDolod - Darken texture for generation
This Mod Darkens some LODs so they look better with the guide ENB.
DynDOLOD - Dynamic Distant LOD Generation
Giving our firstborn to Sheson
Running DynDOLOD is really a two part process. The first - TexGen - creates texture atlases based on the games installed textures. These atlases are required for the second step, DynDOLOD itself, which uses them so that when distant LODs transition to closer ones, the texture sets match up in a better way. That, by itself, would make this worth running, but it does more! It also is responsible for allowing you to see running water, waterfalls, windmills turning, and other dynamic motions from a long distance - something that Vanilla Skyrim doesn't do.
TexGen64
- Select TexGenx64 from the MO2 executable dropdown and hit Run.
- Change Stitched Object LOD Textures "Base size" to
256 (1440p). - Change Rendered Object Textures "Base size" to:
256 (1440p). - Change Tree/Grass LOD Billboards to the following:
- Units per pixel:11.0 (1080p).
- HD Grass: Unchecked.
- Tree: Checked, Direct -170, Ambient -60.
- HD Tree: Checked, Direct -170, Ambient -60, Smoothness -0.
- Rendered: Checked, Direct -100, Ambient -95, Smoothness -0. - Diffuse alpha:
Default (BC7 Quick). - Diffuse:
Default (BC7 Quick). - Normal specular:
Default (BC7 Quick). - Normal:
Default (BC7 Quick). - Click Start and allow TexGen to run.
- Once it has finished, click Exit to exit TexGen.
- Copy and paste the
TexGen_Outputto your MO2 mods folder (i.e.MO2\Mods) . - Activate the newly created
TexGen_Outputmod in MO2.

DynDOLOD64
- Select DynDOLODx64 from the MO2 executable dropdown and hit Run.
- In the top left section of the popup window, Right-Click in the Worldspaces Box and “Select All”.
- In the top right section, check
CandlesandFXGlow. - In the top right section, select
High. - In the Options category in the bottom section, check
Object LOD,Level32,Dynamic LOD,Glow windowsandHigh - For Ultra trees (guide default), check
Ultraand uncheckTree LOD. For traditional tree LOD, checkTree LODand uncheckUltra. - Set "Max tile size LOD" to
1024. - Set "Max tile size full" to
256. - Set "Billboard brightness" to
-5. - Set "Max tile size billboard" to
1024. - Check
Fake lights child world. - Check
Upgrade NearGrid large references to FarGrid. - Uncheck
Downgrade FarGrid refrences to NearGrid. - Check
Occlusion data. - Below "Occlusion data", set "Quality" to
3. - Check
Plugin. - Check
Terrain underside. - Uncheck
Seasons. - Check
Parent > Child - locate Tree mesh rules, then change LOD 8 to
Billboard4and LOD 32 toBillboard6. - locate \ mesh rules, then change LOD 32 to
Level0 - In the bottom right section, click the
OKbutton to begin LOD generation. This will take a while. - Once generation has been completed, select
Save and Exitto close the window to exit DynDOLOD. - Copy and paste the
DynDOLOD_Outputto your MO2 mods folder (i.e.MO2\Mods). - Activate the newly created
DynDOLOD_Outputmod in MO2.


DyndoLOD FX Glow Accurate Disabler - Quality of Life
This mod lets you disable the buggy lights generated by DynDOLOD FxGlow without disabling others.
Designed for Lexy's Legacy of the Dragonborn: Special Edition modlist. Work for everybody